Inter VRF NAT
by netslackThis, the first post of netslack, is going through a NAT scenario where multiple VRFs is in use.
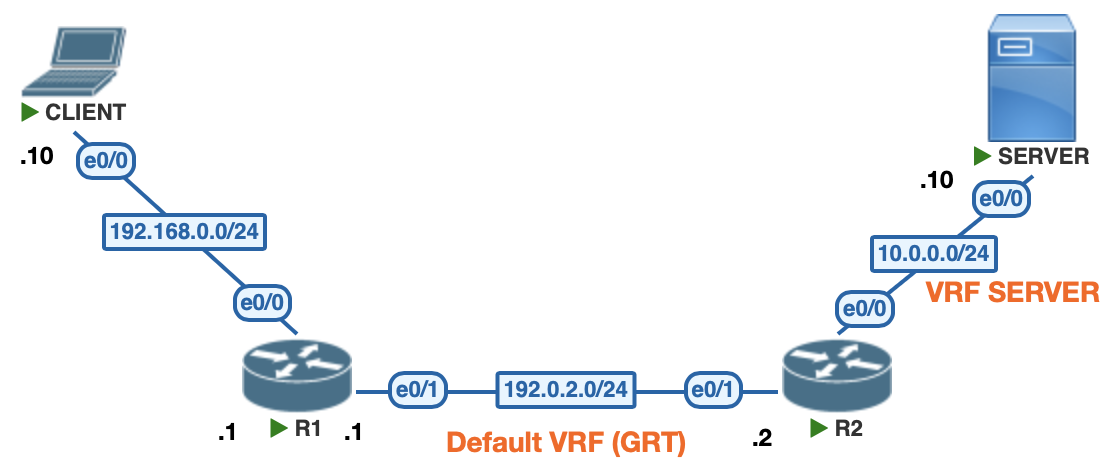
The topology looks like this. A client with RFC1918 address need to reach a server on the internet. The client is connected to a router (R1). The server is connected to another router (R2).
R1 is doing NAT overload to translate the client's ip address to a public adddress. R2 is also configured to do NAT overload for the server, as well as NAT incoming traffic to the server.
R2's interface facing the internet (eth0/1) is in the default VRF (Global Routing Table), and the interface towards the server (eth0/0) is in a VRF named SERVER.

First, let's configure the client with a ip adress and default route:
CLIENT(config)#interface eth0/0
CLIENT(config-if)#ip address 192.168.0.10 255.255.255.0
CLIENT(config)#ip route 0.0.0.0 0.0.0.0 192.168.0.1
Next, the server configuration. We also configure a telnet password for verification.
SERVER(config)#interface eth0/0
SERVER(config-if)#ip address 10.0.0.10 255.255.255.0
SERVER(config)#ip route 0.0.0.0 0.0.0.0 10.0.0.2
SERVER(config)#line vty 0 15
SERVER(config-line)#transport input telnet
SERVER(config-line)#password Password!
In R1 we configure the interfaces, including assigning the inside and outside regarding NAT.
The inside is our interface on the client side, and the outside is the interface to the internet, with a public IP.
We also configure a default route, and the NAT overload to translate the client's requests to R1's public IP address.
R1(config)#interface eth0/0
R1(config-if)#ip address 192.168.0.1 255.255.255.0
R1(config-if)#ip nat inside
R1(config)#interface eth0/1
R1(config-if)#ip address 192.0.2.1 255.255.255.0
R1(config-if)#ip nat outside
R1(config)#ip route 0.0.0.0 0.0.0.0 192.0.2.2
For the NAT overload we first creates an access list to define what source addresses we want to match.
R1(config)#ip access-list standard NAT
R1(config-std-nacl)#permit 192.168.0.0 0.0.0.255
Then we do the NAT configuration. We tell the router to translate traffic coming from the inside to the outside. The address to be translated is the source on traffic matching the access list named NAT. Replace the source address with the address of interface eth0/1, and do PAT (overload) so that multiple clients can be translated using only one public ip address.
R1(config)#ip nat inside source list NAT interface ethernet 0/1 overload
Now, the remaining configuration is done on R2.
R2(config)#interface eth0/1
R2(config-if)#ip address 192.0.2.2 255.255.255.0
R2(config-if)#ip nat outside
Since the server should be in a separate VRF, we also create the VRF.
R2(config)#ip vrf SERVER
R2(config)#interface eth0/0
R2(config-if)#ip vrf forwarding SERVER
R2(config-if)#ip address 10.0.0.2 255.255.255.0
R2(config-if)#ip nat inside
The default route for the server network is a bit special. The interface connected to the public internet is in the default VRF, and the server is in the VRF named SERVER.
In this case we need to specify both the egress interface and the next-hop ip address.
We also need to specify the VRF in the NAT statements.
R2(config)#ip route vrf SERVER 0.0.0.0 0.0.0.0 Ethernet0/1 192.0.2.1
R2(config)#ip access-list standard NAT
R2(config-std-nacl)#permit 10.0.0.0 0.0.0.255
R2(config)#ip nat inside source list NAT interface Ethernet0/1 vrf SERVER overload
Lastly, the configuration for incoming traffic to the server. We will use a dedicated ip address for this translation (192.0.2.10):
R2(config)#ip nat inside source static 10.0.0.10 192.0.2.10 vrf SERVER
That's it! Let's try a telnet connection from CLIENT to SERVER:
CLIENT#telnet 192.0.2.10
Trying 192.0.2.10 ... Open
User Access Verification
Password:
SERVER>
